

RO2 Guide
5/14/2013
Starting the Game:
Log-in Screen
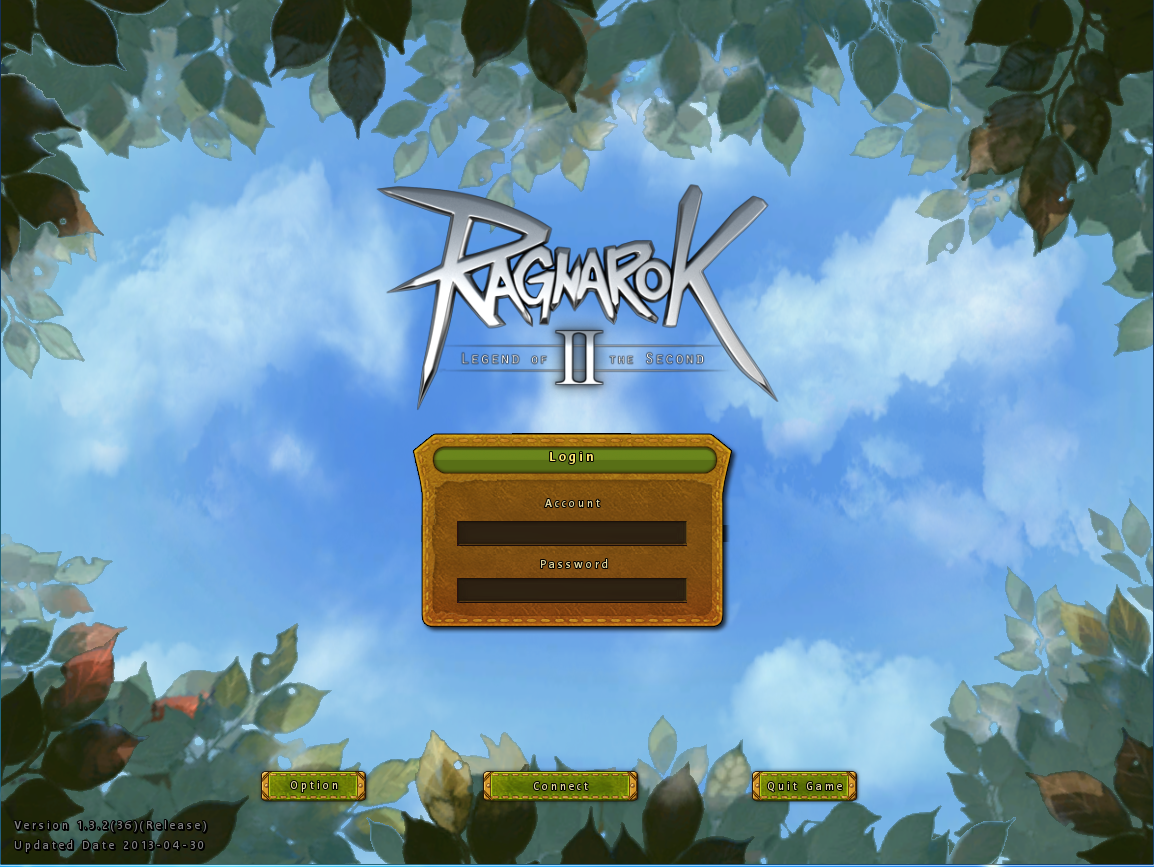
At the log-in screen, input your account name and password. This would be the Ragnarok Online 2 account you set up in your Warpportal account. Click “connect”, and then you will then be prompted to choose or enter a pin number. Once done, select the server and channel. The number of colored bars symbolizes how many people are currently playing in that channel, ranging from green (fewer people in game) to red (more people in game).
Creating a Character
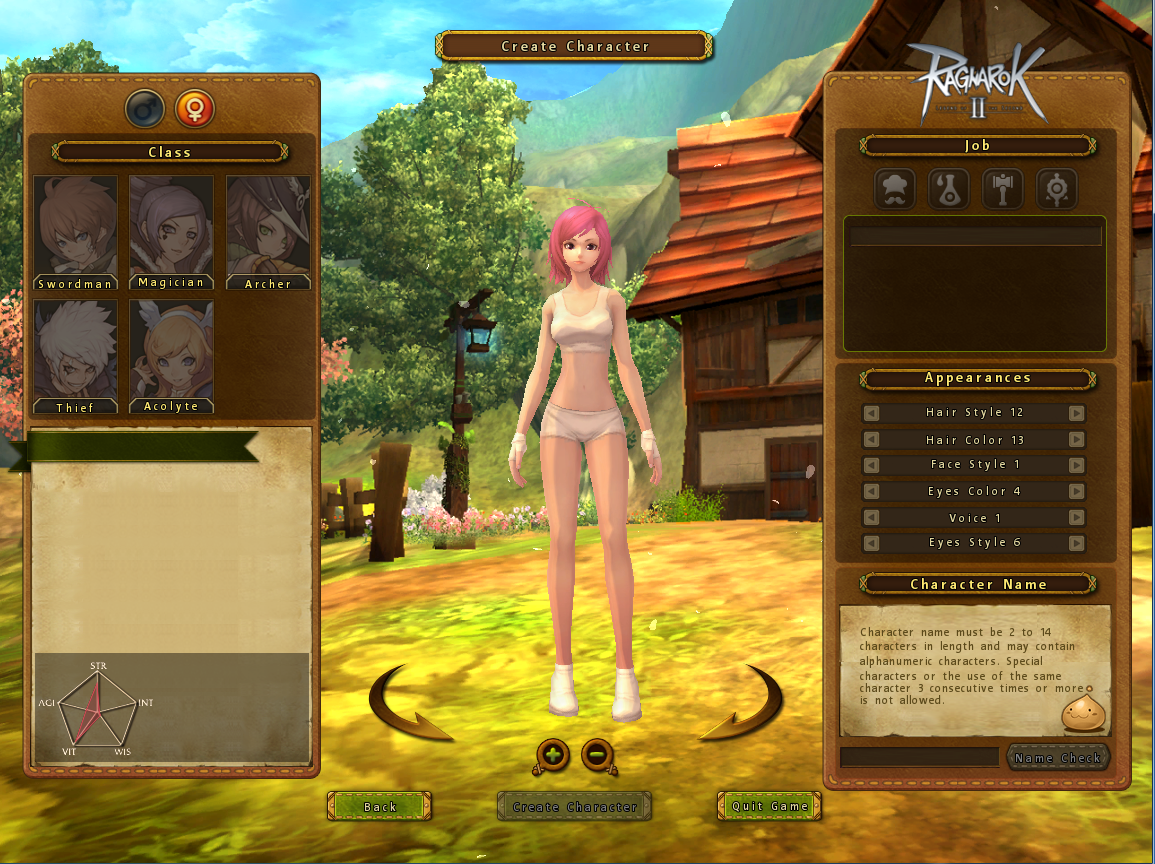
There are a number of choices you have when creating your character. You can choose between male or female, one of the two races (Human or Noel), one of the five classes (Swordsman, Magician, Archer, Thief, and Acolyte), and a job (Artisan, Blacksmith, Chef, or Alchemist). Click on the images to select, and a description of each class and job will appear in the boxes below.
You are also able to customize your character’s features by clicking the right and left arrows on each of the appearance options. Press the plus and minus signs to zoom in and out on the character, and the arrows to turn the character around. Once satisfied with the appearance, you can name the character. Use name check to make sure the name isn’t already in use. When finished, click “Create Character”.
Character Screen

Select the character you would like to use, and then click “Start Game”.
Gameplay and Interface:
Basic Key Controls
There are two ways to move. The first way would be using the WASD keys on your keyboard. The second way would be to use your mouse to point and click, guiding your character to the chosen location.
WASD keys:
To move the character forward, press the W key.
To move the character sideways, press the Q and R keys.
Pressing A and D keys shift the camera and point of view to the left and right.
Pressing the S key moves the character backwards.
You can press a combination of keys such as Q+W (to move forward diagonally) or W+A (to move forward while changing the point of view).
Press the space bar to jump and Numlock to run automatically.
Mouse:
You can right click on the land to move the character to that point.
The left click on the mouse moves the point of view camera around the character.
The right click on the mouse moves the camera via the character’s point of view.
You can zoom in and out by using the mouse wheel.
Quests
  |
When there is a yellow exclamation point above a NPC’s head or on the map, it means that they have a quest available. Right click on the NPCs, and a dialogue box will appear with the available quests listed. Choose the quest you would like to review, and click “Accept” to receive the quest or “Reject” if you do not want the quest.
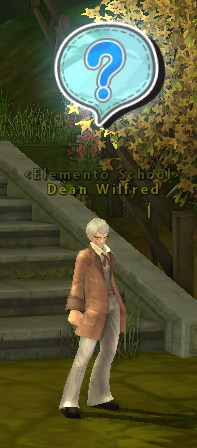
When there is a quest ready to be completed, a blue question mark will appear above the NPC and on the map. Right click on the NPC, click on the quest title, and hit “Complete” to receive the reward(s). At any time you feel like you cannot complete a quest, you can abandon it by returning to the NPC and clicking “Abandon” in the dialogue box, or by opening the quest diary (hotkey L). |
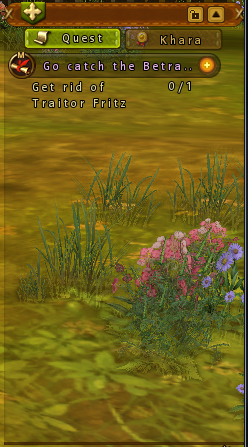
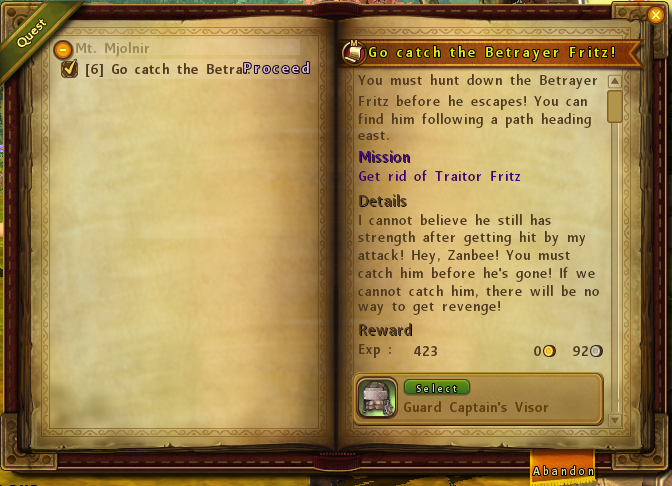
To keep track of progress, use the quest tracker located on default at the right-hand side. You can register quests to this window by opening the quest diary (hotkey L), and checking the quests you would like to keep track of. The quest tracker is separated by regular quests, and by Khara quests. The Khara quests can be accepted and completed by opening the Khara Info Window (hotkey O).
Attacking and Looting
You can select a monster and view its stats by left-clicking it. Right-clicking on a monster will target and attack. You can also increase attack damage by using your skills located at the bottom of the screen (with default hotkeys of 1, 2, 3, etc.).
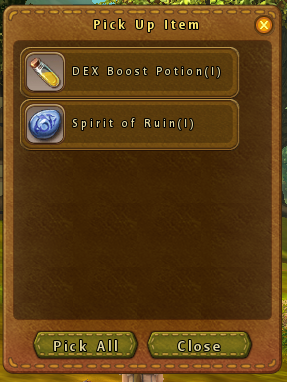
When you see glowing, right-click on the monster remains to open the loot window. You can choose which items to loot, or select “Pick All” to receive all the items. In some cases, you can also harvest the remains according to the job you had picked.
Character and Skills
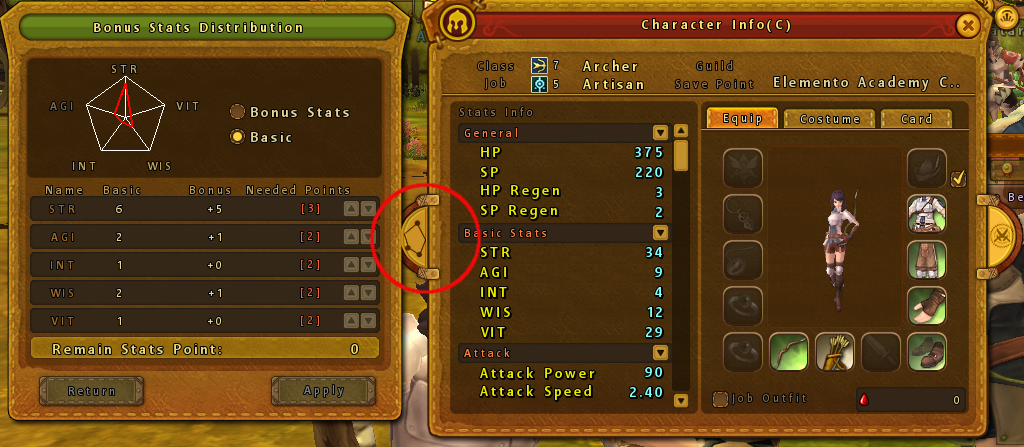
You can view your character’s info (hotkey C). You can equip items by right-clicking them in your storage bags or by clicking and dragging them to the open “Equip” slots. Once you gain a level, you gain stat points that you can distribute into STR, AGI, INT, WIS, and VIT. To get to the stats distribution window, press the yellow button on the left of the character info window.Use the arrow keys to increase or decrease stat points.
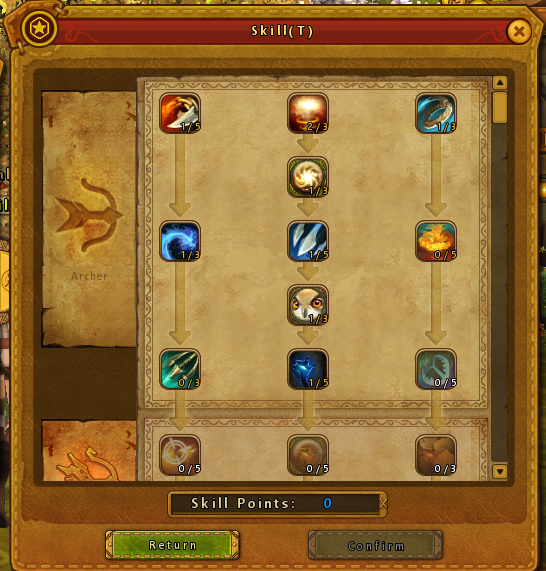 |
You can also view your skills by opening the skill tree (hotkey T). You receive one skill point per level gained, of which you can then distribute by clicking on the skills on the skill tree. To use the skills in battle, you can either left-click on the skills on the skill bar, or you can register the skills to hotkeys. |
Buying/Selling/Trading
If you would like to view an item’s description, hover your mouse over the item image and a description box will show up.
 |
To buy items from NPCs, right-click on the NPC you would like to purchase from and then choose “Item List”. You can change the quantity of the items you would like, and then press “Buy” to finalize the purchase. The items will then appear in your storage. If you would like to sell an item, right-click the image in your inventory or drag the item from the inventory to the shop window. |
|
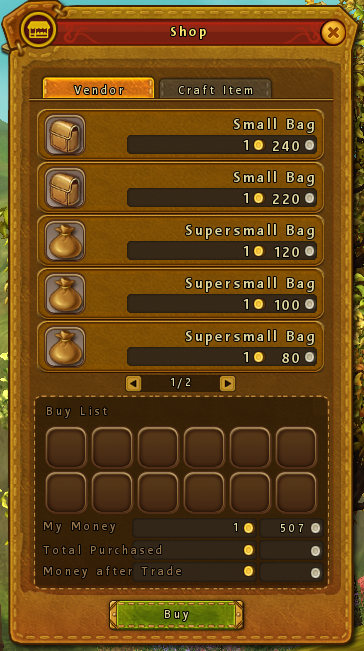
You are also able to buy from vendors, which are shops opened by other players. To add to the buy list, you can right-click on the item or drag the item to the buy list slots. Then press “Buy” to make the purchase. You are also able to open a shop once you reach level 10 by locating the vendor option in the menu (hotkey Y). Take note, you can only buy or sell whole stacks of items in the vendor. |
 |
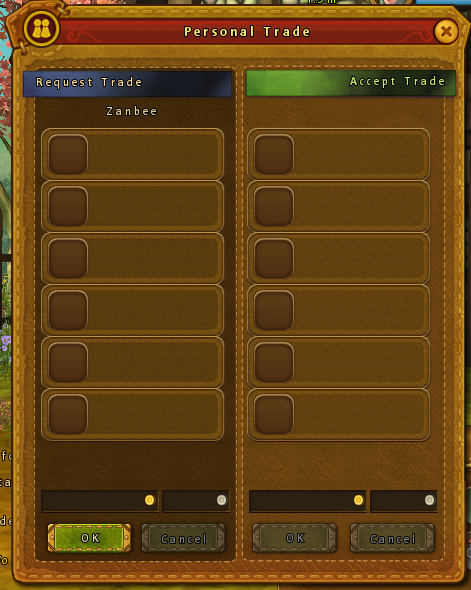 |
To trade with a player, right click on their image in the status bar, and choose “Trade Request”. If the other party accepts the request, a trade window will appear. Drag the item(s) you would like to trade from your inventory into the trade window slots. Confirm the item(s) and accept the trade when satisfied. |
Kafra Shop

There are a number of cash items available for purchase in the Kafra shop, which is accessible with the “Kafra Item Shop” icon located at the bottom right corner of the screen. You would need to first purchase Warpportal points and then convert into KafraCash before you can purchase any items from the shop. Some items have expiration dates so please keep that in mind when purchasing from the Kafra shop.
Map

The mini map is located at the top right-hand corner. You can zoom in and out of the mini map by pressing the + and – buttons. To open the world map, you can click on the “World Map” button located at the mini map or press hotkey M.
Communicating and Interacting with Others
Chat box

The dialogue box can be found on default at the bottom left corner of the interface right above the menu. If you would like to write something, press Enter on your keyboard or click inside the chat box area. Click the up arrow to choose where or who you would like to write to or choose the question mark to view the chat shortcuts.
 |
You can also filter which conversations are shown in the dialogue box by right-clicking the tabs. You have to be level 15 to participate in the public chat. |
Interacting with Players
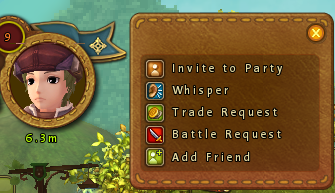
There are a number of options that show up when you click on a person and right-clicking on their profile image or by right-clicking on a name in the chat box. You can invite people to your party, whisper, trade, add friend, and PVP by sending a battle request. Sometimes, it is necessary to party with other players. You can also find a party or to recruit to your party by opening the Find Party window from menu (hotkey N).
Mailbox
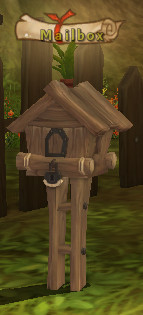
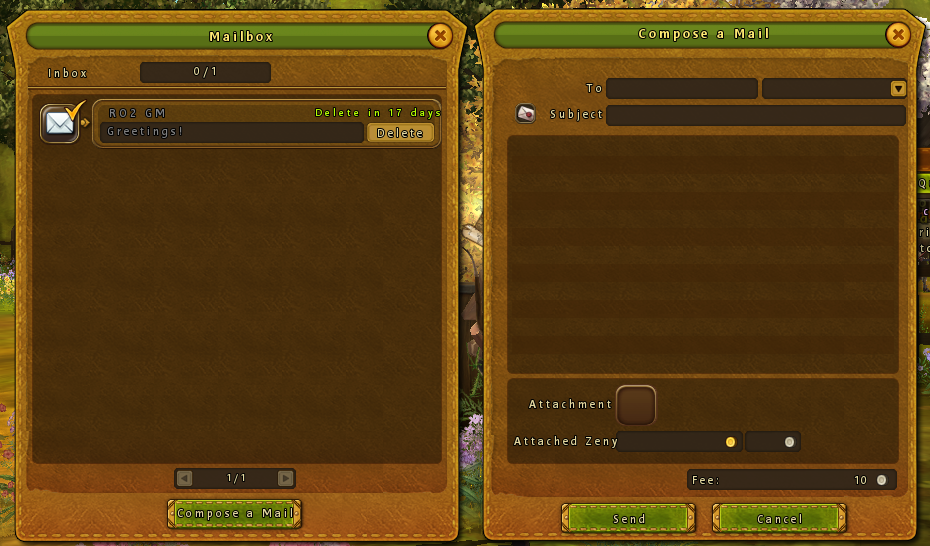
The mailbox is a great way to send greetings, letters, attachments, and zeny to another person. To check or send your mail, visit the mailbox located by the envelope icon on the mini map. Right-click on the mailbox NPC. Press “Mailbox” in the conversation window to open your inbox. If you would like to send mail, press “Compose a Mail”. Fill out the needed information and then hit “Send” or “Cancel”.
Khara Quests
|
Pressing "O" will bring up the Khara Quest window. Khara Quests are additional challenges that you can complete for experience and Titles.
Clicking on the arrow located at the right of the window will expand to include the Khara Title Window. Here, you can find more information of the Khara Titles you have earned. Equipping a Khara Title will give special bonuses. It will also show up as a pre-fix to your name.
Occassionally, there will be special Event Khara Titles that can be added as a suffix to your name. |
